로그인과 포스팅 관련 기능 구현을 위해 mysql과 sequelize를 사용하여 데이터베이스 설정하는 과정을 거쳤다. 이를 간략하게 정리하면서 복습하려고 올리는 글!
먼저 데이터베이스 설정은 크게 4단계로 진행하였다.
- 모델 정의
- 시퀄라이즈에 모델 등록
- 모델 관계 설정
- 데이터베이스 생성
- 모델 서버 연결
1. 모델 정의: models 폴더에서 진행
node.js는 모델 정의 js 파일을 models 폴더 안에 만든다.
const Sequelize = require('sequelize');

module.exports = class User extends Sequelize.Model{
    static init(sequelize){
        return super.init({
            email:{
                type: Sequelize.STRING(40),
                allowNull: true,
                unique: true,
            },
            nick:{
                type: Sequelize.STRING(15),
                allowNull: false,
            },
            password:{
                type: Sequelize.STRING(100),
                allowNull: true,
            },
            provider:{
                type: Sequelize.STRING(10),
                allowNull: true,
                defaultValue: 'local',
            },
            snsId:{
                type: Sequelize.STRING(30),
                allowNull: true,
            },
        },{
            sequelize,
            timestamps: true,
            underscored: false,
            modelName: 'User',
            tableName: 'users',
            paranoid: true,
            charset: 'utf8',
            collate: 'utf8_general_ci',
        });
    }

    //static associate(db){}
};
위 코드는 User 모델을 정의한 파일을 가져온 것이다.
구조를 살펴보면,
- 먼저 sequelize 라이브러리를 불러와,
- sequelize의 model 클래스를 extends하여 User 클래스를 만든다.
- 그리고 그 안에 init(sequelize)라는 정적메소드를 정의하여 테이블 스키마를 초기화한다.
- super.init을 반환한다.
- super.init의 첫번째 인자는 테이블 각 칼럼의 정의(공홈에 따르면 attributes),
- super.init의 두번째 인자는 테이블 자체에 대한 정의(공홈에 따르면 options)
- super.init을 반환한다.
- associate(db){...}로 테이블 간의 관계를 정의하는데 이 부분은 뒤에 설명하겠....
- 그리고 그 안에 init(sequelize)라는 정적메소드를 정의하여 테이블 스키마를 초기화한다.
https://sequelize.org/master/manual/model-basics.html
Manual | Sequelize
Model Basics In this tutorial you will learn what models are in Sequelize and how to use them. Concept Models are the essence of Sequelize. A model is an abstraction that represents a table in your database. In Sequelize, it is a class that extends Model.
sequelize.org
2. 시퀄라이즈에 모델 등록: model/index.js에서 코드 수정
const Sequelize = require('sequelize');
const env = process.env.NODE_ENV || 'development';
const config = require('../config/config')[env];
const User = require('./user');
const Post = require('./post');
const Hashtag = require('./hashtag');

const db = {};
const sequelize = new Sequelize(
  config.database, config.username, config.password, config,
);

db.sequelize = sequelize;
db.User = User;
db.Post = Post;
db.Hashtag = Hashtag;

User.init(sequelize);
Post.init(sequelize);
Hashtag.init(sequelize);

User.associate(db);
Post.associate(db);
Hashtag.associate(db);

module.exports = db;- sequelize 라이브러리 불러오고,
- 환경변수 env를 'development'(개발용)으로 설정하고,
- config 모듈(개발용으로)도 불러오고,
- 내가 작성한 모델 파일들(User, Post, Hashtag)도 불러온다.
- 일단 빈 db 정의해놓는다.
- sequelize 생성자로 sequelize 변수 생성한다.
- config 설정파일에서 개발용 설정 정보(데이터베이스, 유저 이름, 비밀번호)를 인수로 입력한다.
- 빈 db에 모델을 연결한다.
- db.sequelize=sequelize;
- db.User=User;
- db.Post=Post;
- db.Hashtag=Hashtag;
- 모델들을 초기화한다(앞에 각 모델에 정의한 init 메소드로!)
- User.init(sequelize);
- Post.init(sequelize);
- Hashtag.init(sequelize);
- 각 모델간의 관계를 연결한다(앞에 각 모델 관계를 정의한 정적메소드인 associate(db)로!)
- User.associate(db);
- Post.associate(db);
- Hashtag.associate(db);
- db 반환될 수 있게 하면서 마무리!
3. 모델 관계 설정: models 폴더 안에 만든 모델 파일에 associate(db) 정적메소드 정의
const Sequelize = require('sequelize');

module.exports = class User extends Sequelize.Model{
    static init(sequelize){
        return super.init({
            email:{
                type: Sequelize.STRING(40),
                allowNull: true,
                unique: true,
            },
            nick:{
                type: Sequelize.STRING(15),
                allowNull: false,
            },
            password:{
                type: Sequelize.STRING(100),
                allowNull: true,
            },
            provider:{
                type: Sequelize.STRING(10),
                allowNull: true,
                defaultValue: 'local',
            },
            snsId:{
                type: Sequelize.STRING(30),
                allowNull: true,
            },
        },{
            sequelize,
            timestamps: true,
            underscored: false,
            modelName: 'User',
            tableName: 'users',
            paranoid: true,
            charset: 'utf8',
            collate: 'utf8_general_ci',
        });
    }

//관계 설정
    static associate(db){
        db.User.hasMany(db.Post);
        db.User.belongsToMany(db.User, {
            foreignKey: 'followingId',
            as: 'Followers',
            through: 'Follow',
        });
        db.User.belongsToMany(db.User, {
            foreignKey: 'followerId',
            as: 'Followings',
            through: 'Follow',
        });
    }
};- associate(db) 정적메소드 안에 그 안에 관계를 정의한다.
<관계 정의 메소드>
-hasOne(_)
-hasMany(_)
-belongsTo()
-belongsToMany(_, {_}): 두번째 인자에는 다양한 옵션들 부여
through: 관계 모델 이름/foreignKey: 상대 모델/as: 현재 모델
https://sequelize.org/master/manual/assocs.html
Manual | Sequelize
Associations Sequelize supports the standard associations: One-To-One, One-To-Many and Many-To-Many. To do this, Sequelize provides four types of associations that should be combined to create them: The HasOne association The BelongsTo association The HasM
sequelize.org
https://sequelize.org/v3/docs/associations/
Relations / Associations - Sequelize | The Node.js / io.js ORM for PostgreSQL, MySQL, SQLite and MSSQL
This section describes the various association types in sequelize. When calling a method such as User.hasOne(Project), we say that the User model (the model that the function is being invoked on) is the source and the Project model (the model being passed
sequelize.org
4. 데이터베이스 생성: config.json 파일 수정, 콘솔 명령
- config.json 파일 수정
- 'development' 개발용 설정에서 password랑 database 이름 자신에 맞게 수정
- 콘솔창에 명령어 입력...하면 끝!!
npx sequelize db:create
5. 모델 서버 연결: app.js 수정
....
const pageRouter=require('./routes/page');
const { sequelize }=require('./models'); //이 부분
....
nunjucks.configure('views', {
express: app,
watch: true,
});
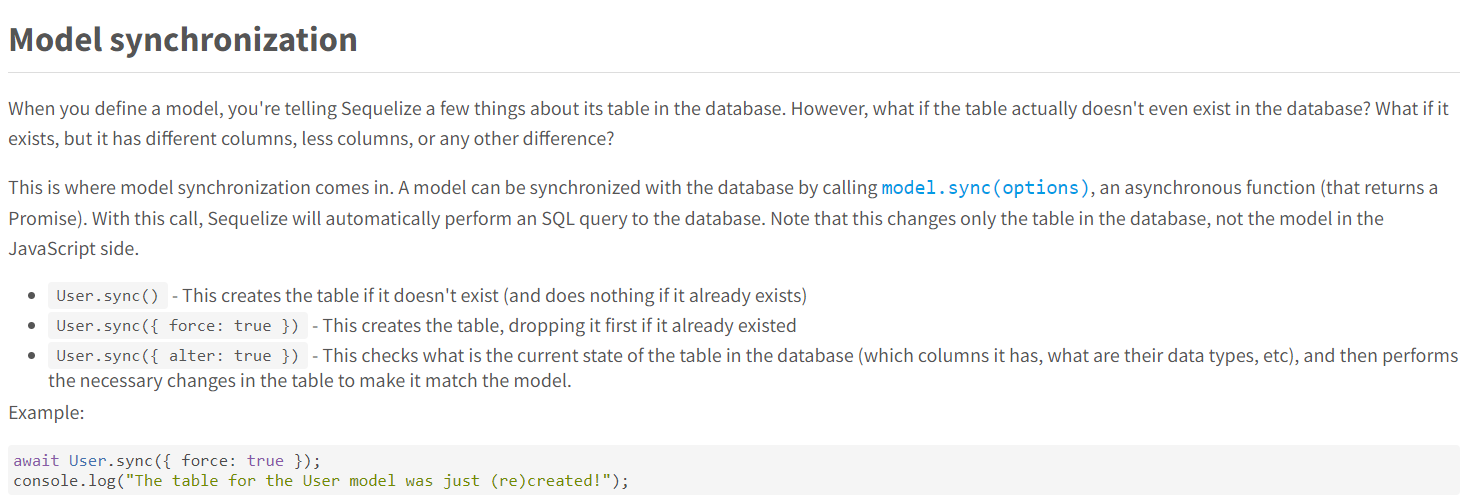
sequelize.sync({force: false}) //이 부분
.then(()=>{
console.log('데이터베이스 연결 성공');
})
.catch((err)=>{
console.error(err);
});
app.use(morgan('dev'));
....- models 불러오고,
- 불러온 sequelize.sync 메소드로 서버에서 모델 연결
- sync 메소드 인자의 force 옵션을
- true로 하면, 테이블이 이미 존재하는 경우에 해당 테이블 삭제하고 새로 생성(강제 업데이트, 기존 데이터 사라짐)한다.
- false로 하면, 테이블이 이미 존재할 때 해당 테이블 그대로 사용한다.
- sync 메소드 인자의 force 옵션을
https://sequelize.org/master/manual/model-basics.html
Manual | Sequelize
Model Basics In this tutorial you will learn what models are in Sequelize and how to use them. Concept Models are the essence of Sequelize. A model is an abstraction that represents a table in your database. In Sequelize, it is a class that extends Model.
sequelize.org
위 페이지에서 자세한 설명을 볼 수 있습니다요!!
여기까지 하면 데이터베이스 세팅 완료!
'Node.js' 카테고리의 다른 글
| [Node.js] 프로젝트 서버 heroku에 배포하기-github 연동 (0) | 2022.06.29 |
|---|---|
| [Node.js] jwt에러 Error: Expected "payload" to be a plain object. (0) | 2022.04.05 |
| [Node.js] body-parser (0) | 2022.04.05 |
| [Node.js] Mongoose connect option is not supported (0) | 2022.04.01 |
| [Node.js] 폴더 구조 정리 (0) | 2022.03.24 |

